😸 Set Up Your Belt

Watching a top shooter perform a .80 draw and a sub-second reload is always impressive. The first thing that usually jumps out at me is the lack of wasted motion. Often, it doesn’t even look like the shooter has to try that hard; it just all seems to happen magically. I can’t promise to cut your draw time in half, but I would like to explain one way you may be able to shave some time off of your draw and mag changes. Having a rig set up properly can do just that. Here are some things I look for when setting up and adjusting my competition rig that will hopefully make you take a second look at the way your belt is set up.

Unfortunately, just having your gear in the same spot every time won’t assure fast draws and reloads. The angle and location of your holster and mag pouches matters more than you might think. Obviously, not everyone is built the same; someone might be tall, short, long torso, short arms, long arms, and the list goes on. There are too many variables in the shooter’s physical build for a holster manufacturer to even try to accommodate, so the BOSS Dropped Offset Holster Hanger is instrumental in making your holster fit you. The BOSS has a mounting plate that securely attaches to your outer belt and features a ladder of holes and channels for mounting options. The mounting options allow you to adjust how high or low the gun sits from your belt and the channels towards the bottom allow you to tilt the gun muzzle forward or backwards.

The most important thing is being able to draw your handgun with the minimal amount of movement or wasted effort. With my hands relaxed naturally at my sides, I want to bring my hand directly to the handgun in a straight line and only need to close my fingers and thumb to get a full grip on the pistol, if possible. If you look very carefully, you will notice most people position their holster perfectly vertical and some shooters need to bend their wrist forward to allow the webbing of their hand between the thumb and index finger to fully contact the beavertail of the grip. Adjusting the holster height and canting the gun to be muzzle forward has been very helpful for shooters I have worked with. The last thing to check is making sure you comply with the holster placement and height rules for your division if you are a competitive shooter.

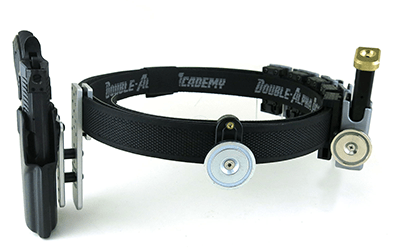
For a competition rig, an inner and outer Velcro belt is without a doubt the way to go. The inner belt threads through your belt loops. You can attach your holster, mag pouches, magnet, caddys, etc. to the outer belt. The setup will guarantee all your equipment keeps the same spacing and makes it very easy to train for fast gun handling since your gear will be in the same place every time. I’ve had very good results using DAA and CR Speed double belt systems.

For holster manufacturers, I really like the GX Products Vice holster that features a clamp that increases the amount of resistance needed to draw the handgun. We’ve all seen shooters running with one hand holding their gun in the holster so it doesn’t fall out. The clamp lock on the holster keeps the gun in the holster until you are ready to draw. The tension on the Vice can also be adjusted. I have my Glock holster set with medium retention when the Vice is activated so I can run around on 2 Gun stages without worrying about my gun falling out, but I am still able to draw it with minimum effort. If you prefer a traditional style kydex holster, I have used a Long’s Shadow Holster for several years without any issues. Long’s Shadow holsters fit the gun very well so the handgun doesn’t rattle around in them.

I feel that drawing a magazine from your mag pouch is just as critical as drawing your handgun from your holster. From your two-handed shooting grip, you should be able to move your support hand straight to the mag pouch and establish the full grip you want on the magazine without the following pouch or magazine getting in the way. I also tilt my pouches slightly backwards because it feels more natural to me when moving my hand directly to the pouches as I am gripping a magazine. Regardless of the relaxed USPSA equipment placement rules for magazine pouches, I still prefer to have my mag pouches start around by hip bone and move backwards in a row as opposed to moving pouches more towards the twelve o’clock position. It’s worth testing different placement and seeing what feels the most comfortable to you. As you adjust these, consider being able to find your third or fourth magazine easily if you are in a low-capacity division. For tension adjustment, I never adjust the pouches as loosely as they will go or until the magazine rattles around. I prefer to have a small amount of resistance when drawing a magazine and it should be tested that the mags will not fall out of your pouch while running hard or moving aggressively.

Another topic that comes up is whether to use mag pouches that face bullets nose out versus bullets forward. I’ve observed a lot of shooters being genuinely fast with both methods and I don’t think there is a clear winner. If you’re already comfortable with one style, I see very few reasons why you should switch, unless you just want to try something different.

I have used several brands of mag pouches and really like the CR Speed pouches due to how rugged they are. I haven’t really seen anything on the market to avoid or that is overly problematic. I think a fair amount of gear issues arise from poorly adjusted gear.

If you are in the market for new mag pouches or holsters, my advice is to check out the products your friends are using or message someone that uses the product you are considering so you can make an informed purchase. If you are happy with the gear you have, take a second look to make sure your holster and mag pouches are adjusted so they fit you and you can use them with the minimum amount of effort.

😸 Grip Pressure and Fitting Your Gun to Your Hands – Part #2

In the previous blog, I explained the grip pressure I use when shooting a handgun. To sum it up, the support hand does most of the work controlling recoil and the firing hand’s main job is just pulling the trigger. Knowing how each hand plays a role in grip greatly influences how the gun should be fit to your hands.

Most pistols have either removable grip panels or interchangeable backstraps that change the shape, texture or circumference of the grip. Most people try different configurations until they find one they like the feel of, but they don’t really inspect how much contact they are making with the frame.

The biggest issue I see is most people set up their handgun to have a grip that is too small for their hands. As I previously explained, the support hand is critical for managing recoil. When the grip is too small, the firing hand will take up most of the real estate on the frame. If gripping your pistol allows your firing hand fingertips to come too close to your palm when they wrap around the grip, you will not have sufficient space for your support hand to contact the gun. This typically results in the support hand mostly resting over the top of your firing hand. Without much contact from your support hand, your firing hand is forced to do the majority of recoil management.

A gun fit properly to your hands should allow the meaty part of your support hand palm to make contact with the grip. Once your support hand is able to contact the grip and apply the proper pressure, grip pressure from your firing hand is not needed to manage recoil.

The second thing to take into consideration is being able to reach the trigger and operate the controls. You should be able to disengage the safety (if applicable) and get your finger on the trigger in a comfortable spot without effort. If you are shooting a DA/SA gun, you could be able to comfortably reach the trigger guard, with the hammer down, in double action mode. Most shooters will need to somewhat shift their grip to reach the slide stop and magazine release. I think that is completely fine. The slide stop isn’t something typically used in practical shooting and extended magazine releases can get activated at times you don’t want them to.

With all those things out of the way, how do you choose which grips to buy ? Unfortunately, I don’t have a measurement or formula to help you decide, but here are a few examples I commonly see. Factory grips like the CZ Shadow 2 or Tanfoglio Xtreme grips are likely going to be too thin and will not have sufficient room for your support hand. I really like LOK, Henning, and SSI grips for pistols with removable grip panels. I prefer the palm swell style for the extra room it creates for the support hand, but they are not for everyone. For guns with removable backstraps, most people seem to prefer either the medium size backstrap or building up the frame with grip tape.

If possible, try other people’s handguns to see what you like the feel of before you buy anything. A grip that feels great to me might not be appreciated by someone else. Hopefully, this has been helpful and gives you some things to think about the next time you pickup your handgun.

😸 Grip Pressure and Fitting Your Gun to Your Hands – Part #1

What we think is happening is often not what is actually happening. When buying a handgun, most competitors choose one based on how the gun feels in their hands, with little thought about if the gun actually fits their hands? Before diving into gun fit though, I think it’s important to explain the grip pressure I use.

Some marksmanship issues can be caused by using too much tension in your firing hand. Frequently, a shooter will tighten their firing hand grip so much that they are unable to press the trigger using only their trigger finger independently from the rest of their hand. The extra movement caused by firing the gun with your entire firing hand will influence where the bullets go to some degree. It also impacts your ability to pull the trigger as fast as you can.

Knowing you will likely get the best accuracy and trigger speed with a relaxed firing hand makes sense, but how will you accomplish that with your handgun recoiling and jumping around inside your hands? This is where the support hand comes into play. With my support hand, I grip the handgun absolutely as hard as I can, without causing a lot of pain or discomfort. I usually feel the sensation of the fingertips of my firing hand being smashed into the grip from the pressure of my support hand. If I maintain a very tight grip with my support hand, the gun will behave differently while recoiling.

Here’s an easy drill that illustrates how vital the support hand is for controlling recoil.

With a completely unloaded gun, find your grip and relax tension in both hands to the point you are holding the gun firmly, so you don’t drop it, but not using all the muscles you have in either hand. While maintaining that very relaxed grip pressure, press your trigger as fast as you can in a cadence of roughly a half second for each pull. If you are using a single-action or striker-fired gun, you can apply pressure into the trigger after it goes dead. Apply more and more support hand pressure without adding any pressure in your firing hand while you continue to press the trigger. You will notice how much less the sights move as support hand pressure is added. You can accomplish the same thing with live ammo on the range, while observing how the gun recoils.

Combining the previous knowledge, the grip I use is holding the gun with my firing hand with little pressure and crushing the gun as hard as I can with my support hand. This grip allows several things. It allows the trigger to be pulled very fast without trigger freeze or unintentional pauses and it makes it easier to fire a handgun accurately during rapid fire while the support hand keeps the gun under control in recoil. The way I think of it is, hold the gun with my firing hand and crush the gun with my support hand.

Unfortunately, being able to use a different grip pressure in each hand is not as easy as it sounds. It does take practice to program yourself to hold the gun the way you want to, if you want to make a change to your technique. A drill I recommend is to draw the gun to sight picture and then check the tension in your hands after each rep. You can also work on dryfire drills with the very last step. Before holstering, check the tension you have in your hands and remind yourself to keep the tension you want.

In the next blog post, I will explain how important grip pressure is for the process I use to fit a gun to my hands. 

😸 Vote Yes Keep And Bear Arms Amendment Iowa State

44 states protect gun rights in their state constitution…but not Iowa !

That means that everything Iowa Gun Owners’ has accomplished over the last fifteen years, from Stand-Your-Ground to Constitutional Carry, could be overturned by a liberal judge.

The ‘Freedom Amendment’ is on the ballot this fall, and Michael Bloomberg is desperately trying to stop it, so that he can systematically destroy our gun rights, one liberal ruling at a time!

Go to our website for more information — and SHARE this video with everyone who cares about freedom and the Second Amendment !

https://fb.watch/gl1SP7jYIw/

https://fb.watch/gkZRmKSXM_/

😺 How To resolve Issues On The Range

In almost all competitive endeavors, there will be disputes: disputes about scoring calls, disputes about penalties, arguments over whether the ball was in or out, whether the runner was safe or out, or where that fish actually came from.

NROI has a discipline procedure, which is a two-tiered system for competitors and range officials to officially file complaints about range officials. First and foremost, however, the issue needs to be brought to the attention of the Range Master during the match. This generally solves all issues, whether it’s just a contested call on the part of the range officer (we are all human, and make mistakes), that needs to be appealed up the chain of command, to concerns about unfair treatment and even cheating on the part of the range official. Per rule 7.2, the Range Master has authority over all match officials other than the Match Director, so he or she is the person that any dispute should be brought to for resolution. If the RM’s answer is not satisfactory, in certain cases the issue can be brought to arbitration. But, in the case of problems with range officials, the RM is the go-to guy for getting your problem solved. Almost 100% of the time, any issue can be worked out on the range.

Should the problem be severe, the RM may discipline the range official, up to and including dismissing them from the staff. This is a very rare occurrence, since most issues are minor: a range official shouting at the squad to help reset, or personality clashes, or the competitor is unhappy with a procedural call. Even if you feel that you are not being treated fairly by a range official, the RM is the person to take your troubles to. At the very least, you can always request another range officer to run you through the course of fire. And, Range Officials take note: this is a reasonable request and should be carried out without hesitation. Sometimes, the competitor may have to wait for another range official to be available, but in those cases, simply move on to the next competitor and keep going. Everybody has a bad day sometimes, but again, most issues can (and should) be solved on the stage.

What happens if the problem is more severe, though ? What if the RO is being accused of cheating, or is being extremely inconsistent with procedural calls or target scoring ? Then, the RM may not only discipline the range official, but may send in an incident report to NROI, and in fact must send one in if any sort of discipline beyond minor coaching is applied. Competitors may also submit an incident report if they are not satisfied that the problem was solved to their satisfaction, but the RM should have been involved and an attempt to rectify the situation made at the range. Waiting until a few days after to submit it strips some of the efficacy from the report, especially if the RM was never involved.

NROI takes all incident reports seriously, and we follow the procedure outlined in the discipline policy. If the complaint is found to have no merit after delving into the details, then that is reported to all parties. If there are some issues, however, the policy outlines what happens, and the resulting discipline can be anything from coaching and counseling to re-educate the range official, to recommending they repeat some training, to removal or downgrading their certification, and ultimately to recommending to the board of directors that their membership be revoked. In all cases, the concerned parties are notified of the decision and any action taken, and a report is made to the board by DNROI.

Bottom line: Try to resolve any disputes at the range and get the RM involved. It’s much better to solve a problem on the spot than to rely on witnesses memories and statements concerning an issue that may have happened days before. And remember, we are all human and mistakes will be made. How that mistake is handled can make all the difference in the world.

😸 Check your gears !

One of the biggest challenges for new competitors is figuring out what gear they need, what gear is legal, and which division they need to register for. NROI and USPSA have been working on getting that info out there in multiple places, but here is a handy guide that has the info and links to resources in one place.

Videos to get you started: USPSA has three videos that are great resources for new competitors who are just getting into USPSA and SCSA. Check out the USPSA website to learn about USPSA in general, the divisions and gear for USPSA and SCSA, and how hit factor scoring works.

Rulebooks: The USPSA Competition Rules and USPSA Rifle, Shotgun, and Multigun Rules can be found on the USPSA website and in the USPSA App. The SCSA rules are found on the SCSA website and in the SCSA App. It is always a good idea to skim the rules before attending your first match. It gets you familiar with the safety rules and the stage procedures.

Holsters: Unless you are shooting PCC division, or a rimfire division in SCSA, you will need a holster that prevents access and activation of the trigger while the handgun is holstered. There are also a few other holster rules that you need to know.

  • Thigh straps are not allowed
  • The holster can’t be canted so the muzzle points further than 3 feet from the competitor’s feet
  • The heel of the butt of the handgun must not be below the top of the belt (read more here).
  • And there are distance requirements for how far gear can be from the inner surface of the belt (surface against your pants). Learn more on that in this video/post.

Magazine length: Be aware that most divisions have restrictions on the length of magazine you can use. This usually isn’t a problem when stock magazines are used, but once new competitors get hooked and discover aftermarket base pads, they sometimes run afoul of this rule. We have a video and post that details this.

Range commands, start positions, and more: Once you get your gear squared away, and want to learn more about other aspects of the sport, check out our NROI Tips videos and posts and other posts on this blog. There is a wealth of info here for competitors and range officials.

Ask questions before you buy: If want to make sure your gear fits the division you intend to shoot before purchase, don’t hesitate to contact us at rules@uspsa.org. If you do this, we appreciate a link to the product on the manufacturer’s website and which division you want to use it in. It helps us answer the question faster.

😸 Go Out And Compete !

I see guys show up with high speed gears, get smoked by some old fart like me who has been shooting for decades, and never return.

It’s fine to go to a match and not have a “competitors” attitude and ego. Go as a way to practice the fundamentals and have a good time.

The moment you do that you’re miles ahead of the mall ninja (or cop or service member) who refuses to go to the range because he might get his ego bruised.

😸 Reloading Component Drills

Procedure:
Start with your pistol aimed at the target. At the signal, eject the magazine from the gun and insert a new magazine. Get another sight picture on the target.

Focus:
Learn to reload quickly and consistently.

Goal:
Your goal is a 1.0 second par time.

Micro Drills:

Drill One:
(Burkett Load) Start with your pistol aimed at the target. At the signal, eject the magazine from the gun and bring the fresh magazine just to the edge of the magwell.
Your goal is a 0.6 second par time.

Drill Two:
Start with a magazine in your hand, just at the edge of the magwell of your pistol. This start position should be exactly the same as the ending position of Drill One.
At the signal, seat the magazine, reacquire your grip, and get a sight picture on the target.

Your goal is a 0.6 second par time.

Commentary:
Reloading is a skill that many people find to be much tougher than drawing. That makes sense, as there is a much more complicated series of actions to learn to perform under pressure. Technical issues, such as how to position the gun when you reload, are things that must be sorted out by the individual. Generally speaking, you will be more consistent if you bring the gun lower down and closer to your body. I strongly recommend you pay close attention to how you angle the magwell of your pistol. I make sure to angle my gun so the magwell points at my mag pouches. Figure out what works for you, then train yourself to use that technique every time.

The biggest challenge J have during these drills is the urge to tense up. When you are tense, it is almost impossible to quickly and consistently hit your reloads. I think that is a great challenge that should prepare you for competition. If you can learn to battle that tension (and occasional frustration) in a dryfire setting, then your odds of success ‘Tor real” get that much better.
I have a couple administrative notes here.
First, it is obviously much more expedient to run Drill One, then Drill Two, then Drill One again. The start position of Drill Two is the same as the ending position of Drill One. This should save you from constantly having to reset your magazines in the pouch.

Second, the goal times are set for your first magazine pouch. I encourage you to work through all of your magazine pouches in dry-fire practice, but you should understand that when you start reaching around your body for your fourth magazine pouch you will likely be quite a bit slower. I have heard the assertion on a few occasions that you should be equally fast from all magazine pouches, but I have never observed this to be the case with my own shooting and I do not have that expectation of anyone else.

😸 Draw Component Drills

Procedure:

Start with your hands relaxed at sides. At the signal, draw your pistol and aim it at the target.

Focus:

Learn to draw quickly and consistently.

Goal:

Draw your pistol and get a sight picture with a good grip in 0.7 seconds, 0.6 seconds if you are using a “speed” holster.

Micro Drills:

Drill One:

Start with your hands relaxed at sides. Get a firing grip on your pistol and move your non-dominant hand over to your dominant side.

Your goal is a 0.4 second par time, with time to spare.

Drill Two:

Start with your gun holstered. Have a firing grip on your pistol with your dominant hand and have your non-dominant hand in position to receive the gun after you draw it. From this start position, draw and aim at the target.

Your goal is a 0.5 second par time.

Optional drill:

Attach your timer to your holster. From a wrists above shoulders start position, slap the timer when you hear the start beep. The timer should pick up that slap and record a time. Strive to make that time as low as possible.

Commentary:

This series of drills and micro drills should help you develop explosive speed from the holster and a reliable grip.

Most people can easily achieve very fast par time in a matter of a few minutes of practice, they just to have the desire to do so, achieving a fast time is one thing. Hitting a perfect grip and sight picture reliably is quire another. It will take regular practice to be able to do this stuff at speed under match pressure. Don’t neglect your training.

There is one major caution that needs to be issued. Note that this drill doesn’t call for you to pull the trigger at any time. Please don’t. Many shooters get in the habit of “racing the beep.” They can build a habits where they end up pulling the trigger at any time. Please don’t. Many shooters get in the habit of “Racing The Beep” They can build a habit where they end up pulling the trigger fast enough to beat the par time, but may or may not have had the sights on target when the trigger was pulled. This is a good way to send rounds into the dirt below a target and in some extreme cases get yourself send home early from a match with a Dairy Queen gift certificate. Don’t be that person !